Buttermilk waffles are a classic breakfast dish that can transform your morning routine into a delightful experience. With their fluffy texture and rich flavor, these waffles elevate any breakfast table. Whether you?re hosting a weekend brunch or simply enjoying a quiet Sunday morning at home, this buttermilk waffle recipe is your go-to solution for a satisfying meal. Made with simple ingredients you likely have in your pantry, these waffles not only taste amazing but also bring comfort and joy to your family and friends.
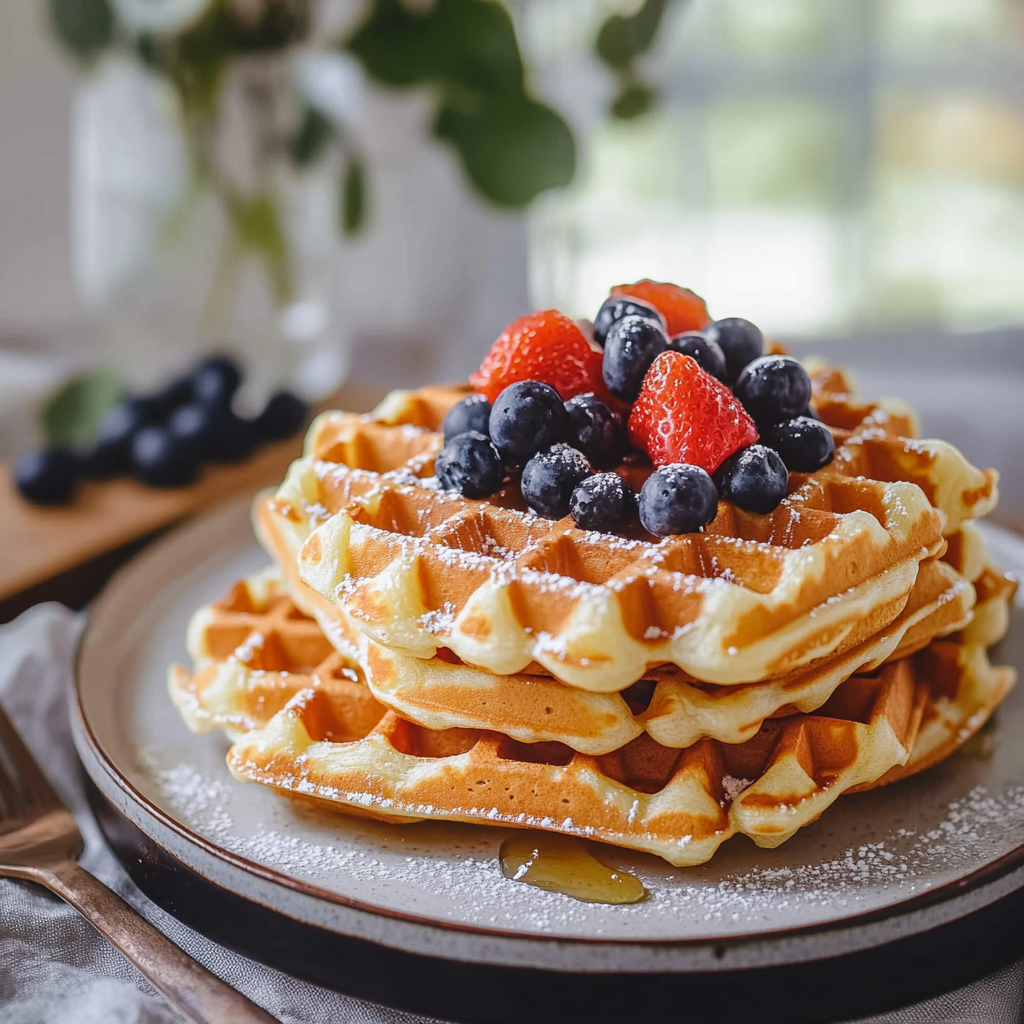
The great thing about buttermilk waffles is their versatility. You can top them with fresh fruits like strawberries or blueberries, drench them in maple syrup, or even add whipped cream for an indulgent treat. Additionally, they are quick to prepare?perfect for busy mornings when you need something delicious yet easy to whip up. This article will guide you through every step of the process from gathering ingredients to serving suggestions.
So let?s dive into the world of fluffy buttermilk waffles and discover how you can make this mouthwatering dish right in your kitchen!
Main Ingredients
All-Purpose Flour
All-purpose flour serves as the backbone of our buttermilk waffle recipe. It provides the necessary structure and helps achieve that tender yet crispy texture we all crave in a waffle. For this recipe, you’ll need two cups of all-purpose flour. Be sure to spoon it into your measuring cup rather than scooping it directly from the bag; this prevents over-measuring and keeps your waffles light.
Baking Powder
Baking powder is essential for making your buttermilk waffles rise beautifully as they cook. It creates air bubbles within the batter that lead to a light and airy texture. You will need two tablespoons of baking powder for this recipe. Make sure it’s fresh; expired baking powder won’t give you the desired fluffiness.
Sugar
Adding sugar enhances the flavor of the waffles while also contributing to their browning as they cook. For this recipe, one tablespoon of granulated sugar is sufficient to achieve that subtle sweetness without overpowering other flavors. Feel free to adjust based on your preference!
Salt
Salt plays a crucial role in balancing flavors in any dish. In our buttermilk waffles, one teaspoon of salt enhances sweetness while also improving overall taste. It?s an important ingredient that should not be omitted!
Eggs
Eggs provide richness and help bind all ingredients together in our waffle batter. They also contribute to the fluffiness we desire in each bite. For our recipe, you’ll need two large eggs at room temperature; this ensures better mixing and results.
Buttermilk
Buttermilk is what gives these waffles their unique tangy flavor and moist texture. The acidity in buttermilk reacts with baking powder to create bubbles that lead to fluffiness during cooking. Use one and three-quarters cups of buttermilk for this recipe; if you don’t have any on hand, you can easily make a substitute by mixing regular milk with vinegar or lemon juice.
Unsalted Butter
Unsalted butter adds richness and moisture to our waffle batter while also contributing to a beautiful golden color as they cook. Melted butter makes it easier to mix into the batter evenly without clumps forming. Use half a cup (one stick) of unsalted butter for this recipe; let it cool slightly before adding it to prevent cooking the eggs.

How to Prepare Buttermilk Waffles
Step 1: Preheat Your Waffle Iron
Begin by preheating your waffle iron according to the manufacturer’s instructions while preparing your batter. This ensures that your waffles cook evenly from start to finish. Most modern waffle irons have an indicator light that signals when they’re ready; typically, it takes around 5 minutes for them to heat up fully.
Step 2: Mix Dry Ingredients
In a large mixing bowl, combine all-purpose flour, baking powder, sugar, and salt using a whisk or fork until well blended. Mixing dry ingredients first ensures even distribution throughout the batter?this step is crucial for consistent flavor in every bite! Set aside your dry mixture temporarily as you prepare the wet ingredients next.
Step 3: Combine Wet Ingredients
In another bowl (preferably medium-sized), whisk together eggs until they’re frothy before adding melted unsalted butter and buttermilk slowly while continuing to whisk thoroughly until well combined?about 1 minute should suffice! This ensures no lumps remain in your batter which could affect cooking later on.
Step 4: Mix Dry & Wet Ingredients Together
Now it’s time to combine both mixtures! Gently fold the wet ingredients into the dry mixture using a spatula or wooden spoon until just combined; avoid over-mixing here! A few lumps are perfectly fine; over-mixing can result in dense waffles instead of light ones so be gentle yet effective during this stage.
Step 5: Cook The Waffles
Once mixed thoroughly without lumps remaining (but not overly so), ladle about half a cup (or recommended amount based on iron size) of batter onto preheated waffle iron according its instructions?close lid securely! Cook for approximately 4-5 minutes depending on desired crispness level indicated by visual cues such as steam reduction or color change?remember not peeking too soon!
Step 6: Serve Immediately & Enjoy!
When cooked perfectly golden brown remove carefully using tongs or fork?serve immediately topped with syrup fresh fruit whipped cream etc as per taste preference?enjoying those delightful fluffy bites straight away will be well worth effort put forth in preparation!
Serving and Storing Tips for Buttermilk Waffles
Serving Suggestions
Buttermilk waffles are incredibly versatile when it comes to serving options! Experiment with different toppings like fresh fruit such as sliced bananas strawberries blueberries etc., drizzled maple syrup whipped cream chocolate sauce nut butter powdered sugar or even yogurt?all complement these deliciously light creations beautifully! Feel free also try savory variations by topping them off with fried chicken bacon avocado salsa etc., depending on mood preferences?making each mealtime different exciting!
Storing Leftovers
If you’re lucky enough to have leftovers after enjoying these scrumptious treats don?t fret?they store quite well! Allow cooled leftover waffles cool completely then stack them between layers of parchment paper inside airtight container refrigerator last up three days without losing quality freshness flavor importantly reheat later enjoy again when craving strikes most convenient option would be toaster oven microwave reheating just few seconds until warm through again serve preferred toppings desired every single time!
By following this comprehensive guide on preparing buttermilk waffles you’ll master how create perfectly fluffy batch right home?all set impress friends family alike at next brunch gathering discover why these tasty delights become favorite staple breakfast choice everyone loves!
Mistakes to Avoid for Buttermilk Waffles
Using the Wrong Type of Flour
Choosing the right flour is crucial for making fluffy buttermilk waffles. Many people might think that all-purpose flour is interchangeable with other types, but this is not the case. All-purpose flour has a moderate protein content that helps create a balanced structure in your waffles. Using cake flour can lead to overly tender and crumbly waffles, while bread flour can make them dense and chewy. To achieve the best texture, stick with all-purpose flour or a blend specifically designed for waffles. Also, be sure to measure your flour correctly by spooning it into the measuring cup and leveling it off. This prevents overpacking, which can result in dry waffles.
Overmixing the Batter
Overmixing is a common mistake when preparing waffle batter. When you combine wet and dry ingredients, gluten develops in the flour. While some gluten is necessary for structure, too much gluten makes your waffles tough instead of light and airy. To avoid this, mix your batter just until you see no dry flour remaining. It’s okay if the batter has some lumps; these will disappear during cooking. If you want to fold in additional ingredients like fruit or chocolate chips, do so gently after achieving a homogenous batter. This technique helps maintain the ideal texture of buttermilk waffles.
Not Allowing the Batter to Rest
Another important step often overlooked is allowing your waffle batter to rest before cooking. This resting period allows the gluten to relax and gives the baking powder time to activate fully. Skipping this step can lead to dense waffles that lack fluffiness. Aim for at least 15-30 minutes of resting time after mixing your batter and before pouring it into your preheated waffle iron. Cover the bowl with a damp cloth or plastic wrap to keep it from drying out during this time.

Tips and Tricks for Buttermilk Waffles
Use Fresh Ingredients
Using fresh ingredients can significantly impact the flavor and texture of your buttermilk waffles. Make sure your baking powder is active; old baking powder can lead to flat waffles that don’t rise properly. To test its freshness, add a teaspoon of baking powder to a small bowl of warm water; if it bubbles vigorously, it’s still good! Additionally, using fresh buttermilk enhances flavor and moisture content in your waffles. If you don’t have buttermilk on hand, you can easily make a substitute by adding a tablespoon of vinegar or lemon juice to regular milk and letting it sit for about 5-10 minutes.
Preheat Your Waffle Iron Properly
Many home cooks underestimate the importance of preheating their waffle irons fully before cooking their waffles. A well-preheated iron ensures even cooking and prevents sticking, resulting in perfectly crisp edges while keeping the insides fluffy. Most modern waffle irons have indicator lights that tell you when they are ready for use, so pay attention to these signals! If you start cooking too early, you risk ending up with soggy, undercooked waffles.
Experiment with Flavors
While traditional buttermilk waffles are delicious on their own, experimenting with flavors can elevate them even further! Consider adding spices like cinnamon or nutmeg directly into your batter for warmth or folding in finely chopped nuts for an added crunch. You could also incorporate extracts like vanilla or almond for extra depth in flavor. For a gourmet twist, try adding ingredients such as mashed bananas or pumpkin puree for seasonal flair.

Suggestions for Buttermilk Waffles
Serve with Toppings
The beauty of buttermilk waffles lies not just in their taste but also in how versatile they are when it comes to toppings! Popular choices include maple syrup, whipped cream, fresh fruits like berries or bananas, and even ice cream for an indulgent treat! Consider creating a topping bar during brunch gatherings where guests can customize their plates according to their preferences?this adds an interactive element that’s fun for everyone involved.
Pair with Savory Sides for breakfast waffles
If you’re looking to balance out the sweetness of buttermilk waffles at breakfast or brunch, consider pairing them with savory sides! Crispy bacon or sausage links complement the sweetness beautifully while adding richness to the meal overall. Eggs cooked any way you prefer?scrambled, poached, or fried?make another excellent pairing option that rounds out flavors nicely without overpowering them.
Make Ahead & Freeze
For busy mornings when time is tight yet nothing beats homemade breakfast options like buttermilk waffles! You can prepare large batches ahead of time on weekends then freeze them individually wrapped in plastic wrap followed by aluminum foil (or use airtight containers). On hectic weekdays simply pop one into the toaster oven until heated through?you’ll enjoy freshly made flavors without spending hours in preparation every day!
FAQs for Buttermilk Waffles:
What ingredients do I need for buttermilk waffles?
To make delicious buttermilk waffles, you will need a few key ingredients. Start with all-purpose flour as your base. You will also need baking powder and baking soda to help the waffles rise and become fluffy. Sugar adds sweetness, while salt enhances flavor. The star ingredient is buttermilk, which provides moisture and a tangy taste that elevates the waffles. Don?t forget eggs; they bind everything together and contribute to the structure. Lastly, melted butter adds richness and helps create a crispy exterior when cooked. For extra flavor, consider adding vanilla extract or spices like cinnamon. Gather these ingredients before you begin cooking to ensure a smooth process.
How do I achieve crispy buttermilk waffles?
Achieving crispy buttermilk waffles involves a couple of key techniques. First, preheat your waffle iron thoroughly; this ensures even cooking and helps develop that perfect crispiness. Use a batter that incorporates melted butter; this fat helps create a golden-brown crust. Avoid overmixing your batter to keep some air bubbles intact, which will aid in fluffiness while still achieving crispness on the outside. Moreover, allow the waffles to cook until they are well-browned before removing them from the iron. If you’re making multiple batches, keep cooked waffles warm in an oven set to low heat, which prevents them from getting soggy.
Can I make buttermilk waffles in advance?
Yes! You can definitely make buttermilk waffles in advance. To do this, prepare the batter as usual and cook the waffles until they are golden brown. Let them cool completely on a wire rack to prevent steam from making them soggy. Once cooled, you can store them in an airtight container in the refrigerator for up to three days or freeze them for longer storage?up to three months is ideal. When you’re ready to enjoy them again, simply pop your frozen waffles into the toaster or reheat them in an oven until warmed through and crispy again.
What toppings go best with buttermilk waffles?
Buttermilk waffles serve as a versatile base for various toppings. Traditional options include maple syrup or honey for a sweet touch. Fresh fruits like strawberries, blueberries, or banana slices add freshness and flavor contrasts. Whipped cream makes for an indulgent treat that pairs wonderfully with fruit toppings as well. For those looking for something savory, consider adding crispy bacon or even fried chicken on top of your waffle for a unique twist on brunch favorites. Nut butter options like almond or peanut butter provide additional richness if you prefer something creamy.
Can I substitute regular milk for buttermilk in waffle recipes?
While you can substitute regular milk for buttermilk when making waffles, it may slightly alter the taste and texture of your final product. Buttermilk contributes acidity that reacts with baking soda and baking powder, helping to create light and fluffy waffles with a unique tangy flavor profile. If you don?t have buttermilk on hand, you can make a quick alternative by adding one tablespoon of white vinegar or lemon juice to one cup of milk; let it sit for about 5 minutes before using it in your recipe.
How can I customize my buttermilk waffle recipe?
Customizing your buttermilk waffle recipe is easy! Start by incorporating different spices like cinnamon or nutmeg into your dry ingredients for added warmth and flavor. You can also mix in chocolate chips or nuts such as walnuts or pecans directly into the batter for added texture and taste variations. For those who love fruit flavors, consider adding mashed bananas or pumpkin puree into the mix; just remember that wet ingredients may require slight adjustments to maintain proper consistency.
Conclusion for Buttermilk Waffles:
Buttermilk waffles are not only delicious but also incredibly versatile and easy to prepare at home. These delightful treats feature simple ingredients such as flour, baking powder, sugar, salt, eggs, melted butter, and of course?our focus keyphrase?buttermilk itself! The unique tanginess from buttermilk enhances both taste and texture while ensuring fluffy interiors paired with crispy exteriors when cooked properly.
You can enjoy these waffles fresh off the iron or prepare them ahead of time for convenience during busy mornings. With endless topping possibilities?from maple syrup to fresh fruits?these buttermilk waffles promise satisfaction at any meal time! Whether you’re creating a classic breakfast spread or experimenting with daring savory combinations like fried chicken atop your waffle stack, there?s no wrong way to savor this dish.
In conclusion, mastering how to make perfect buttermilk waffles opens up opportunities for creativity in every bite while delivering comfort food at its finest! Embrace this delicious recipe today and elevate your brunch game while enjoying homemade goodness that family members will love!
Print
Buttermilk Waffles
- Total Time: 30 minutes
- Yield: Approximately 8 servings 1x
Description
Buttermilk Waffles are a breakfast classic that promises to elevate your morning routine. With their light, fluffy texture and subtle tang from buttermilk, these waffles are perfect for any occasion?from leisurely brunches to quick weekday breakfasts. Topped with fresh fruit, maple syrup, or whipped cream, they offer endless possibilities to satisfy every craving. Follow this simple recipe to create delicious homemade waffles that will impress family and friends alike.
Ingredients
2 cups all-purpose flour
2 tablespoons baking powder
1 tablespoon granulated sugar
1 teaspoon salt
2 large eggs
1? cups buttermilk
? cup unsalted butter (melted)
Instructions
Preheat your waffle iron according to the manufacturer?s instructions.
In a large bowl, whisk together flour, baking powder, sugar, and salt.
In another bowl, whisk eggs until frothy; then add melted butter and buttermilk, mixing well.
Gently fold the wet ingredients into the dry mixture until just combined?some lumps are okay.
Pour about half a cup of batter onto the preheated waffle iron and cook for 4-5 minutes until golden brown.
Serve immediately with your favorite toppings.
Notes
For added flavor, incorporate cinnamon or vanilla extract into the batter.
Leftover waffles can be stored in an airtight container in the fridge for up to three days or frozen for longer storage.
- Prep Time: 10 minutes
- Cook Time: 20 minutes
Nutrition
- Calories: 220
- Fat: 9g
- Carbohydrates: 30g
- Protein: 6g